


Why Upper Cross Syndrome Keeps Coming Back
You’ve probably done the exercises. Chin tucks. Band pull-aparts. Pec stretches. Maybe some shoulder blade squeezes. Your chiropractor, physical therapist, or personal trainer told you to pull your shoulders back and down, lift your chest, keep your head up.
It helped. For a while.
Then the tightness came back. The headaches returned. The neck stiffened up again. And you started to wonder whether this is just something you have to manage indefinitely — whether your posture is too far gone, your desk job too entrenched, your habits too hard to change.
That’s not what’s happening. What’s happening is that the treatment addressed the symptoms of upper cross syndrome without addressing what’s driving it. And until the driver is addressed, the pattern keeps reasserting — because the body keeps rebuilding the compensation that makes sense given what’s happening below the shoulders.
What Standard Treatment Gets Right — and What It Misses
The Janda model of upper cross syndrome — tight upper traps, levator, and pecs against weak deep cervical flexors and lower trapezius — is accurate as far as it goes. The muscle imbalance is real. The treatment logic of stretching what’s tight and strengthening what’s weak is directionally correct.
What it misses is the driver.
Upper cross syndrome doesn’t start in the neck. In most patients, it starts with their dominant pattern and that often begins away from the neck.
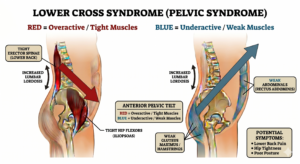
How the Pattern Develops: Bottom Up
Here’s what a PRI-informed evaluation finds in a patient presenting with classic upper cross syndrome:
At the pelvis and lumbar spine: Anterior pelvic tilt — the pelvis tips forward — drives the lumbar spine into overextension. The deep abdominals, specifically the transversus abdominis, become inhibited. This creates a disconnection between the pelvis and the rib cage — the two structures that should be working together to stabilize the spine lose their coordination. The rib cage flares forward and upward. Even pelvic floor issues can show up at neck pain as the pelvis tries to stabilize.
At the rib cage: A flared rib cage locks the thoracic spine — particularly above T4 — into flexion. This is the part of the pattern that standard upper cross analysis identifies as “thoracic restriction” — but the standard model treats it as a local problem. It isn’t. It’s a consequence of what’s happening below.
The flared rib cage also has a breathing consequence that most clinicians miss entirely: when the rib cage is locked forward, the patient cannot breathe into the posterior rib cage. They can’t get air into the back of their lungs. So they go get it somewhere else — with their neck muscles.
At the breathing pattern: With diaphragm efficiency compromised by rib cage position, the body recruits accessory breathing muscles — the scalenes, the sternocleidomastoid, the upper trapezius — to assist with every breath. Every breath. Twelve to sixteen times per minute. At rest.
The neck muscles that are already tight from the upper cross pattern are now also being used as breathing muscles. Every breath reinforces the
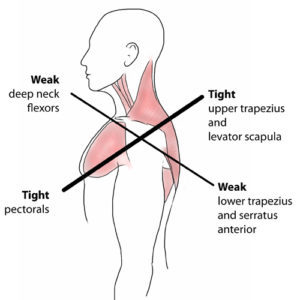
View of Upper Cross Syndrome
tension. The pattern is being loaded continuously, not just during posture or activity.
This is paradoxical breathing — chest rising on inhale rather than the belly and lower rib cage expanding — and it’s one of the most common and least evaluated findings in patients with chronic neck pain.
At the thoracic spine: The thoracic spine locked in flexion above T4 forces the upper cervical spine to extend to right the visual field. The eyes need to be level. The brain will do whatever it takes to make that happen — including compressing the upper cervical spine and overloading the suboccipital muscles to tilt the head back over a flexed thorax.
The asymmetry layer: On top of all of this, the body isn’t developing this pattern symmetrically. The diaphragm attaches differently on the left and right sides due to the position of internal organs — the liver on the right, the heart tilting left. The right diaphragm has a longer, stronger line of pull. With every breath, this asymmetric pull rotates and compresses the rib cage toward the dominant right side.
The spine gets progressively loaded into a corkscrew pattern — pelvis rotating one direction, rib cage countering, cervical spine compensating to keep
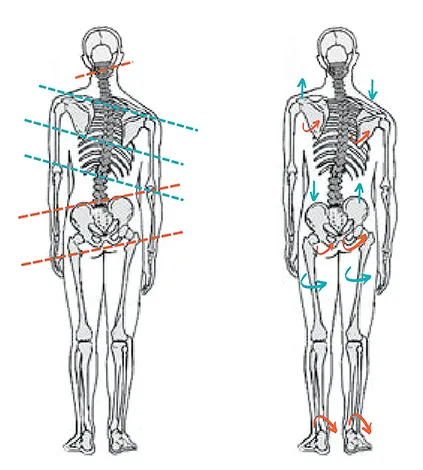
Asymmetry is often unrecognized in standard chiropractic and physical therapy.
the eyes level. Every breath, every step, every hour at the desk reinforces it. The pattern isn’t just a posture problem. It’s being driven by the most fundamental movement the body makes — breathing.
In some patients, the pattern has additional upstream drivers that compound everything described above — foot mechanics and arch function,
dental occlusion, and visual or vestibular input can all contribute to cervical tension in ways that standard neck treatment never evaluates. A malocclusion that causes the jaw to search for its bite turns on the cervical musculature with every swallow and clench. Foot mechanics that alter heel, arch, and toe contact change how ground reaction force travels up through the entire kinetic chain into the spine. These cases require a broader evaluation — and are the subject of a separate article.
Why Standard Treatment Produces Partial Results
When you understand the full pattern, it becomes clear why the standard upper cross treatment approach works temporarily and then fails:
Chin tucks address the forward head position — but if the thoracic spine is locked in flexion by a flared rib cage, the chin tuck is working against a structural constraint that hasn’t been released. The correction can’t hold.
Pec stretching addresses the tight pectorals — but the pecs are tight partly because the rib cage position they’re attached to hasn’t changed. Stretch the muscle without changing the bony position it attaches to and it will return to its resting length in short order.
“Shoulders back and down” cuing — one of the most common postural corrections given — often causes patients to flare the rib cage further in order to pull their shoulders back. The correction reinforces the driver of the pattern.
Scapular strengthening in standard positions loads muscles that the nervous system has inhibited for positional reasons. If the rib cage is flared and the thoracic spine is locked, the lower trapezius and serratus anterior can’t function correctly regardless of how much resistance you apply to them.
This is why PRI corrective exercises may look paradoxical to a clinician trained in the standard model. The exercises don’t look like posture correction. They look like the opposite — because they’re designed to address the driver at the pelvis and rib cage before attempting to correct what’s happening at the neck and shoulders.
What Actually Fixes It
The correct treatment sequence more often addresses the pattern from the bottom up:
Address the pelvis and lumbar spine Restore anterior pelvic tilt, activate the transversus abdominis, and re-establish the connection between the pelvis and rib cage. Until this step is complete, everything above it is working against a moving floor.
Address the rib cage Reduce rib cage flare and restore the ability to breathe into the posterior rib cage. This is where PRI breathing exercises come in — and where they look most counter-intuitive. The cuing is not “breathe deep and sit up straight.” It’s positional — specific body positions that mechanically allow the diaphragm to work correctly and the rib cage to descend.
When the rib cage descends, three things happen simultaneously: the thoracic spine unlocks, the accessory neck breathing muscles stop being recruited with every breath, and the upper cervical compression begins to reduce on its own.
Address the thoracic spine With the rib cage in a better position, thoracic mobility work is now working with the system rather than against it. Thoracic extension becomes accessible. The upper cervical spine no longer needs to compensate as dramatically.
Address the cervical spine and shoulder girdle Now the standard upper cross work — deep cervical flexor activation, scapular stabilization, rotator cuff coordination — can be loaded effectively because the base it’s sitting on has been corrected.
This sequence is why results exceed the standard approach. It’s not that the standard exercises are wrong. It’s that they’re being applied in the wrong order, to a system that hasn’t been prepared to accept them.
Awareness First — Always
One of the most important parts of this approach is patient education. The pattern is being reinforced continuously — at the desk, in the car, during sleep, with every breath. A patient who doesn’t understand their dominant pattern can’t make the small daily habit changes that determine whether the correction holds between visits.
At Ashworth, patients leave the first visit understanding:
- What their dominant pattern looks like and why their body developed it
- Which daily habits and positions are reinforcing it
- What simple position and breathing corrections they can make immediately
- What the home exercise program is designed to do and why it looks the way it does
Awareness is the first correction. Without it, the work done in the clinic has to overcome everything the patient does the other 23 hours of the day.
What This Looks Like at Ashworth
Dr. Matt Wilson has been training with the Postural Restoration Institute since 2020. Before that, he practiced standard chiropractic for 11 years. The difference in outcomes — specifically for patients with chronic neck pain, persistent upper cross syndrome, and postural patterns that haven’t responded to standard care — has been significant enough that PRI analysis is now the foundation of every evaluation at the clinic.
The evaluation identifies the full pattern before treatment begins. The treatment sequence addresses the driver first. The patient leaves the first visit with the tools to start changing the pattern on their own — because awareness and home care are not add-ons. They’re where the correction actually happens.
Most patients with upper cross syndrome driven by this full pattern see a big reduction in symptoms in 6–10 visits, home care and education is key to keeping symptoms at bay and retraining your pattern. Patients who have been in standard treatment for months without lasting results often see more progress in the first four visits than they’ve seen in the preceding year — because for the first time, the treatment is addressing what’s actually driving the problem.
Frequently Asked Questions
Why didn’t my previous treatment fix this? Most upper cross syndrome treatment addresses the neck and shoulders in isolation — which is where the symptoms are, but not where the pattern originates. Correcting the cervical spine without addressing the pelvis, rib cage, and breathing pattern is like fixing a leak in the ceiling without finding where the water is coming from.
How is the PRI approach different from standard chiropractic? Standard chiropractic addresses joint restrictions where they’re found. PRI-informed chiropractic asks why those restrictions exist and what positional pattern is driving them — then addresses the driver in the correct sequence. The evaluation takes longer. The treatment plan looks different. The results hold longer.
Will I need to do exercises at home? Yes — and they matter more than the in-clinic work in some ways. The pattern is being reinforced continuously by daily habits, breathing mechanics, and movement. Home exercises and position awareness are what change the baseline between visits.
How long does treatment take? Most patients resolve in 6–10 visits. Patients with longer chronicity or more complex patterns may take somewhat longer. The goal is always discharge — not indefinite maintenance.
Do I need a referral? No. Iowa is a direct access state for both chiropractic and physical therapy.
Related articles: